

How to Customize MS Word Template You Download
Well, since you’ve reached this section, it’s time to customize your MS Word template elements.
Take a look at this Microsoft page. It provides a concise description of how to customize a Word template: “Make the changes you want, then save and close the template“. However, let’s be more detailed about this process.
Tip: Create a backup copy of your template before making any adjustments to it.
It only requires a few final touches to give the document a professional look, specifically:
- Your company logo,
- Your brand colors,
- Your brand fonts,
- Also, your MS Word template was designed using formatting tools that are part of the standard MS Word software package. You can easily customize these template elements by following the instructions provided below.
Where to download a ready-made logo?
If you’re focused on formatting an important document, creating a new logo yourself can be a distraction. Consider these two alternatives to save valuable time:
- Download a ready-made free logo and be prepared for its usage to require attribution.
- If attribution isn’t to your liking, the best option is to purchase a professional logo from a marketplace like PoweredTemplate.
PoweredTemplate is a subscription-based library with a captivating offer.
For a low monthly fee, you get access to thousands of cool customizable templates, logos, photos, etc. for all your needs.

Add Your Company Logo to Customize Your Template
Branding is a crucial part of promoting your business in the market. Therefore, your logo should be present, at the very least, on the cover of your doc.
We have prepared a placeholder for your logo on the cover page of the template. MS Word offers a simple and straightforward mechanism for inserting images into the document. Let’s use it to customize your template:
- Click on the logo placeholder on the cover page to focus on it.
- Find and click the “Pictures” button under the Insert tab to bring up the context menu.
- In the context menu, click “This Device…” and select the logo file from your computer to replace the placeholder.
If you want the logo to appear on the pages throughout your document, create a header and/or footer. These page elements are also intended for such use. Please note that MS Word can distinguish between even and odd page headers and footers. This feature will be useful if you want to place the logo on the spreads of the doc rather than on each page.
Here you can find detailed information on how to create headers and footers to customize your MS Word template.
Choose a Color Scheme that Matches Your Branding
You can change the color scheme provided in the template to one of the standard schemes available in MS Word or create a new one.
To change the color scheme of the template, follow these instructions:
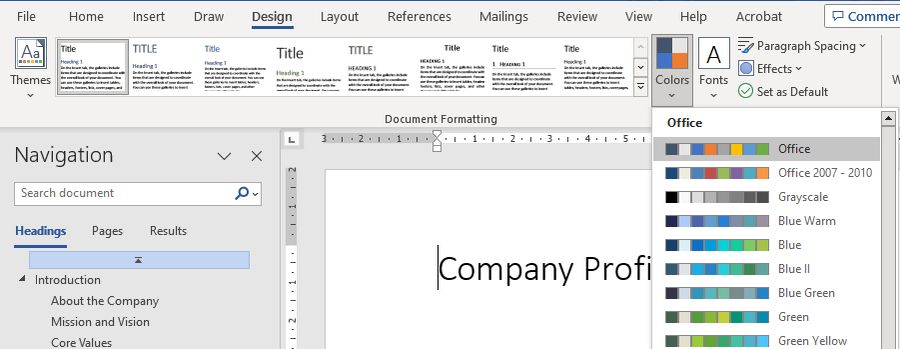
- Click on the “Design” tab.
- Find and click the “Colors” button below it; a list of existing color schemes will appear.
- Select the scheme that best matches your brand.
To create a new color scheme for your doc, click the “Customize Colors…” button below the list of existing color schemes and follow the instructions provided on that page.
Choose Fonts that Match Your Branding to Customize Your Template
For maximum convenience and understanding of the content in your doc, we recommend using readable and clear fonts. Classic fonts such as Arial, Times New Roman, or Calibri are optimal choices. Avoid overly narrow or stylized fonts to ensure ease of perception and a professional appearance for your document.
To change the font in your MS Word document, follow these instructions:
- Highlight the text you want to change by clicking and dragging the cursor over the desired text.
- Next, find the Home tab in the top menu of the document and click on it.
- In the “Font” group, you will see a dropdown menu with a list of available fonts. Choose the desired font from the list by clicking on its name.
- Now, the text in your document should appear with the selected font.
Please remember to save the changes in your document to preserve the new font.
These instructions are convenient when you need to change the font and perhaps its size in one or two places within the document.
How to Quickly Change Formatting Throughout Your MS Word Document
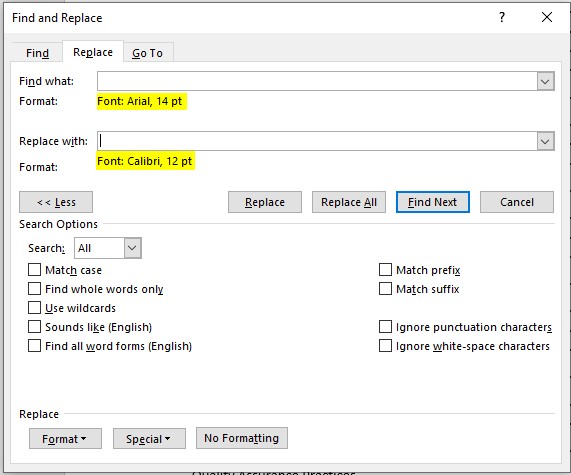
If you want to change the font, its size, and formatting elements throughout the entire document, you can use the “Find and Replace” dialog to customize your MS Word template. For example, if you want to replace all occurrences of text with the font Arial, size 14, with Calibri, size 12, follow these steps:
- Open your document in MS Word.
- Press the Ctrl + H key combination. The “Find and Replace” dialog will open.
- Click on the “Replace” tab, and then click the “More>>” button to reveal the “Format” button at the bottom of the “Find and Replace” dialog.
- Click in the “Find what” field to focus on it, then click the “Format” button.
- In the drop-down menu of the “Format” button, choose “Font”. The “Font” dialog will open.
- In the “Font” dialog, select the font “Arial” and its size (14).
- Click “OK” to close the “Font” dialog.
- Click in the “Replace with” field to focus on it. Click the “Format” button again, and repeat the instructions from steps 5 to 8 to enter the new font “Calibri, 12”.
- Now, click the “Replace All” button to have MS Word replace all occurrences of “Arial, 14” with “Calibri, 12” in your file.
- After the replacement is completed, click “Close” to close the “Find and Replace” dialog.
- If your doc contains a Table of Contents, don’t forget to update the page numbers.
- Please save your document.
Now, throughout your document, all segments that used the font “Arial, 14” will be replaced with “Calibri, 12”.
Conclusion
In conclusion, personalizing a downloaded MS Word template is a straightforward task. Adding your company logo, aligning color schemes with your branding, and selecting suitable fonts contribute to a unique identity.
If you’re looking to make global adjustments, you have a variety of tools at your disposal. Among these, the powerful “Find and Replace” feature can efficiently modify font styles and sizes throughout your document.
With these steps, you can swiftly and effectively tailor MS Word templates to your preferences.